Monday, February 24, 2020

Carrot Cake Muffins (Gluten Free and Vegan)


CARROT CAKE MUFFINS

I made some blueberry muffins (see link below) they other day and they turned out great.  I made a few changes to make the muffins vegan (swapped out soy yogurt for cow’s milk yogurt and used flax egg in place of regular eggs).  The muffin had a nice dense, moisture texture and I instantly thought that I would like to try to make this muffin with different ingredients since I liked the muffins so much.  Today was my attempt at a Carrot Cake Muffin and the results were great!  These muffins are gluten free, oil free, and vegan.  Today I made both the blueberry version and the carrot cake version and now my freezer is well stocked with healthy and easy snacks.

Carrot cake muffins

Inspired by a recipe on www.glutenfreeonashoestring.com


INGREDIENTS

2 1/4 cups (225 g) certified gluten free old fashioned rolled oats (or regular rolled oats if GF is not an issue)
1/2 cup (80 g) granulated coconut palm sugar (or light brown sugar)
1 1/2 teaspoons baking powder
1/2 teaspoon baking soda
1/4 teaspoon kosher salt

1 1/2 teaspoons ground cinnamon

3/4 teaspoon nutmeg, freshly grated if you have it
1 cup (240 g) smooth applesauce, at room temperature
1/2 cup (114 g) plain yogurt (I used Silk brand soy yogurt), may use any other plain yogurt if desired
2 flax eggs (combine 2 tablespoons ground flax need/ground flax seed with 5 tablespoons water, let it rest for about 10 minutes before adding to the dry ingredients), may use 2 eggs if desired

1 teaspoon vanilla extract
1 cup coarsely grated carrot (about 2 medium carrots), I used my box grater

1/2 cup pecans, chopped

1/4 cup raisins

  • Preheat your oven to 325°F. Grease or line the wells of a standard 12-cup muffin tin, and set it aside.
  • In a blender (or food processor fitted with the steel blade), place the oats and process into a fine powder. If you’re using coconut palm sugar, place that in the blender, too, and process it too. Pour the oat flour mixture into a bowl. Add in the baking powder, baking soda, salt, cinnamon, and nutmeg.  Stir to combine.

    Create a well in the center of the dry ingredients and add the applesauce, yogurt, flax eggs, and vanilla, and mix nearly combined. Add the carrots/pecans/raisins and mix gently until these ingredients are evenly distributed throughout the batter. The batter will be thick but very soft. Divide the batter evenly among the prepared wells of the muffin tin. Shake the tin back and forth to evenly distribute the batter in the wells.
  • Place the tin in the center of the preheated oven and bake until the tops of the muffins are nicely domed and they spring back when pressed gently with a finger, 20 to 22 minutes. Remove from the oven and allow to cool for about 10 minutes in the tin before transferring to a wire rack to cool completely.


Tuesday, January 28, 2020

Sugar Cookies with Lemon and Nutmeg (Vegan)


Sugar Cookies with Lemon and Nutmeg (Vegan)

Now that my husband has joined me in a plant based/vegan diet, we are seeking out lots of new recipes.  My husband has quite a sweet tooth so I make a treat to have in the house now and again and he’s trying to be good about limiting his portions.  Of course I enjoying having any excuse to bake and try new recipes.

I asked him what sweet treat he wanted after we finished off some yummy and healthy blueberry muffins the other day.  He said, “Sugar Cookies!”  Most vegan sugar cookies I found call for vegan butter or vegan buttery spread.  I’ve never purchased these items so I looked for a recipe which used oil instead of “butter”.  I found a great looking recipe on a blog called “The Mostly Vegan” and the recipe turned out great.  Here is the recipe link:


As if often the case with me, I decided to modify the recipe.  The sugar cookies I typically make are my husband’s Grandma’s recipe.  Unlike many sugar cookie recipes, Grandma’s recipe does not contain vanilla or vanilla extract; instead the cookies are flavored with finely grated fresh lemon zest and ground nutmeg.  The new recipe I was using called for vanilla so I just left that out. The new recipe I was using also called for adding colorful sprinkles to the cookie dough so the sprinkles were dispersed all through the dough.  I think that idea is brilliant but I had a feeling my husband would not like that.  So in my version of the cookies, I did not add any sprinkles to the dough but I added some colored sugar to the tops of my cookies as you can see in the photos.  

I am looking forward to making the new recipe again and will try it out with the sprinkles IN the dough. I think my friends at my fabulous local yarn store (Yarned & Dangerous, Canon City, Colorado) will like the colorful cookies!


Sugar Cookies with Lemon and Nutmeg
Based on a recipe found on “The Mostly Vegan” blog; Original recipe can be found here:


  • 2 cups unbleached, all-purpose flour
  • 1 teaspoon baking powder
  • ¾ teaspoon baking soda
  • 3/4 teaspoon coarse kosher salt (if using a finer grain salt, use just 1/2 teaspoon salt)
  • 1/2 teaspoon ground nutmeg (freshly grated if you have it)
  • 1 cup organic cane sugar
  • ½ cup neutral vegetable oil 
  • ¼ cup water
  • 1 teaspoon apple cider vinegar
  • finely grated lemon zest/peel from one small to medium sized lemon (I used a Microplane grater to finely remove/grate the yellow part only) 
  1. In a large bowl, whisk together flour, baking powder, baking soda, salt, and nutmeg. 
  2. In a separate bowl, whisk together sugar with oil, water, apple cider vinegar, and fresh lemon zest until smooth and incorporated.
  3. Add wet ingredients to the flour mixture and stir until well combined.  At this point you can refrigerate the dough or bake it right away. The original recipe suggests refrigerating the dough first so that the cookies do not spread too much while baking. I baked my cookies right away without first chilling the dough and I am happy with how the cookies turned out.
  4. Preheat the oven to 375 F. Line cookie sheets with parchment paper. Use an ice cream scoop or 2 tablespoon measuring spoon to portion dough into small mounds. Press down gently on the mounds with your palm to flatten slightly. Decorate the top of each cookie as desired (sprinkles, colored sugar, whatever you prefer on your sugar cookies).
  5. Bake for 8 to 10 minutes. The cookies should be puffed up and very lightly browned on the bottom (but not on the edges or tops). Remove from oven and allow to cool on the pan for 2 minutes before removing to a cooling rack. Repeat with remaining cookies.  
  6. Cookies will deflate slightly while cooling. Store in an airtight container for up to 5 days.


Sunday, January 26, 2020

The BEST Vegetarian Chili Ever


THE BEST VEGETARIAN CHILI EVER


I guess sometimes my posts are more like recipe reviews.  I have been trying lots and lots of new recipe lately. In fact, I have so many recipe that I want to try in the near future that sometimes I lose track of all the recipes.  When I saw this recipe on one of my favorite cooking blogs (www.ambitiouskitchen.com) and I saw that the recipe freezes well, I decided to make the chili and then just freeze nearly all of it.  I enjoy all of the healthy cooking I do for myself, but sometimes there are just too many portions for just me to eat.  When my husband saw that this recipe has a “bunch of orange stuff in it”, I knew it would be up to me to eat all of this.  Lately I’ve had the idea to find more freezer friendly recipes and make big pots of soup and then freeze many of the portions so I can just enjoy a portion now and again instead of eating the same chili seven days in a row.  

So almost all of this chili went into the freezer but I had a little tiny bowl so I could see if it really is the Best Vegetarian Chili Ever.  It’s mighty tasty.  I really like it.  I regret that I did not let my chili simmer just a bit longer than I did.  Some of my carrot and sweet potato chunks were a bit larger than the rest and I would have liked for them to have cooked a bit longer.  I figure when I defrost a portion of this chili, I could simmer it on the stove top for awhile to soften up the vegetables a bit more.

Here is the recipe link for THE BEST VEGETARIAN CHILI EVER.

Saturday, January 25, 2020

Oatmeal Blueberry Muffins (Vegan)


Oatmeal Blueberry Muffins (Vegan)


This recipe comes from a blog called “Gluten Free on a Shoe String”.  Here is the recipe link:


I’ve been making a few sweet treats lately.  For me, it’s always fun to see if I can make a healthier version of something.  For this recipe, I also had to swap out a few ingredients to make the muffins vegan.  For the eggs called for in the recipe, I used flax eggs. I combined 2 tablespoons of ground flax seed/flax seed meal with 5 tablespoons of water and let it sit together to “gel” for about 10 minutes before adding in the other wet ingredients.  The recipe also calls for Greek yogurt.  This week I purchased a tub of Silk brand plain yogurt which is made from soy milk.  Since Greek yogurt is much thicker than the soy yogurt, I did allow the soy yogurt to drain a little bit before using it in the recipe.  I put some paper towels in a fine mesh sieve. The yogurt really did not drain, but the paper towel did wick away quite a lot of moisture.  Next time I want to drain yogurt, I think I will try a coffee filter instead of paper towel.  

With the modifications I’ve noted above, my muffins turned out great!  They are dense and moist and have just the right amount of sweetness to me.  I like it very much when I find a muffin with a great texture and I can see how I could easily swap ingredients to make different varieties.  I can see this being a great carrot cake muffin or perhaps apple and cinnamon.  I only tried these muffins after they had cooled.  My husband said the muffins did not have a good texture when they were still very warm right out of the oven; he says the texture is much better once the muffins have cooled.  I bet these muffins will also freeze very well... if there are any left in a few days.  

Healthy blueberry muffins

Modified from a recipe found on www.glutenfreeonashoestring.com”

INGREDIENTS

2 1/4 cups (225 g) certified gluten free old fashioned rolled oats (or regular rolled oats if GF is not an issue)
1/2 cup (80 g) granulated coconut palm sugar (or light brown sugar)
1 1/2 teaspoons baking powder
1/2 teaspoon baking soda
1/4 teaspoon kosher salt
1 cup (240 g) smooth applesauce, at room temperature
1/2 cup (114 g) plain Greek-style yogurt (1%, 2% or 0% fat—but I prefer 2%), at room temperature I substituted an equal amount of Silk brand plain yogurt which is made from soy milk.
2 eggs (100 g, weighed out of shell) at room temperature, beaten I substituted flax eggs (I combined two tablespoons of ground flax seed and five tablespoons of water and let it rest for about 10 minutes before adding it to the wet ingredients.
1 teaspoon pure vanilla extract
About 3/4 cup fresh (or frozen) blueberries 
  • Preheat your oven to 325°F. Grease or line the wells of a standard 12-cup muffin tin, and set it aside.
  • In a blender (or food processor fitted with the steel blade), place the oats and process into a fine powder. If you’re using coconut palm sugar, place that in the blender, too, and process it too. Create a well in the center of the dry ingredients and add the applesauce, yogurt, flax eggs, and vanilla, and mix until just combined. Add the blueberries and mix gently until the blueberries are evenly distributed throughout the batter. The batter will be thick but very soft. Divide the batter evenly among the prepared wells of the muffin tin. Shake the tin back and forth to evenly distribute the batter in the wells.
  • Place the tin in the center of the preheated oven and bake until the tops of the muffins are nicely domed and they spring back when pressed gently with a finger, about 18 minutes. Remove from the oven and allow to cool for about 10 minutes in the tin before transferring to a wire rack to cool completely.


Seeded No-Knead Bread


Seeded No-Knead Bread

The other day, I was looking at a collection of recipes. The link is here:


One recipe in particular stood out to me so I made it; here is the recipe link:


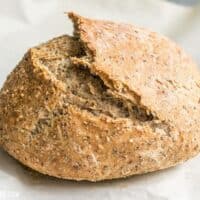
This bread is so good and it’s actually really easy to make.  You just have to plan ahead to make bread like this because the dough needs to sit for at least 12 hours before you bake it.  Is it weird that I took so many photos of this bread from a variety of angles?  It’s just such a pretty loaf of bread!  The bread has an amazing crust because it’s baked in a Dutch Oven.


This simple Seeded No-Knead Bread is packed with seeds for extra texture, flavor, and nutrients! BudgetBytes.com

5 from 10 votes

Seeded No-Knead Bread

This simple Seeded No-Knead Bread is packed with seeds for extra texture, flavor, and nutrients! 
Prep Time13 hrs
Cook Time40 mins
Total Time13 hrs 40 mins
Total Cost: $0.68 recipe / $0.17 serving
Servings: 4

Ingredients

  • 2 Tbsp rolled oats $0.02
  • 1 Tbsp chia seeds $0.16
  • 1 Tbsp hemp seed hearts $0.17
  • 1 Tbsp ground flaxseed $0.04
  • 1/2 cup warm water $0.00
  • 1 cup all-purpose flour $0.08
  • 1/2 cup whole wheat flour $0.10
  • 3/4 tsp salt $0.02
  • 1/8 tsp instant yeast (or bread machine yeast) $0.02
  • 1/2 cup room temperature water $0.00

Instructions

  • Place the oats, chia seeds, hemp hearts, and flaxseed in a small bowl. Add 1/2 cup warm water and stir to combine. Let the seeds soak for 1 hour.
  • In a separate large bowl, combine the all-purpose flour, whole wheat flour, salt, and yeast. Stir until very well combined. Add the soaked seeds and then stir until they are as combined as possible (the mixture will be fairly dry). Add about 1/2 cup water, or just enough to form a sticky dough. The dough should be wet enough that there is no dry flour left on the bottom of the bowl, but not so wet that it appears slimy. It should be sticky to the touch. 
  • Cover the bowl of dough loosely with plastic and let it sit at room temperature for 12-18 hours. If you can not tend to the dough within 18 hours, you can press "pause" on the fermentation by transferring the bowl to the refrigerator.
  • When you're ready to make the bread, the dough should have expanded and have an almost fluffy appearance. Sprinkle it liberally with flour and scrape it away from the edges of the bowl. Turn the dough over on itself in the bowl a few times, adding more flour as needed to keep it from sticking to your hands, until it forms a smooth ball and is no longer quite as sticky.
  • Transfer the ball of dough to a piece of parchment paper and let it rise for one hour. About half way through the rise time, place a Dutch oven, with its lid, into your oven and set it to bake at 425ĀŗF. Allow the Dutch oven to preheat inside the oven for 30 minutes.
  • Once the dough has risen a bit on the parchment (it will tend to spread out and not so much up), it's time to bake. Carefully remove the Dutch oven from the oven, remove the lid, and then lift up the entire piece of parchment with the dough and place them inside the Dutch oven. Place the lid back on the Dutch oven and carefully return it to the hot oven.
  • Bake the bread in the Dutch oven for 30 minutes, then carefully remove the lid and bake for another 10 minutes so the top can brown. When finished baking, carefully pick up the parchment to lift the bread out of the Dutch oven and allow the bread to cool slightly before cutting and serving.

Friday, January 24, 2020

Baked Potato Topped with Mixed Veggies and Ranch Dressing


Baked Potato Topped with Mixed Veggies and Ranch Dressing


I have a fun sort of childhood memory about Ranch Salad Dressing. I don’t recall having Ranch Salad Dressing until I was at least 10 years old (I know that because we moved from California to Oregon when I was nine years old and I can remember my mom making Ranch Dressing in our new home).  My mom made the Ranch Salad Dressing with the dry packet mix and I think she had to add buttermilk and mayonnaise. She always made the dressing in a translucent green square-shaped Tupperware container so we called the dressing “Square Box Dressing” instead of Ranch Dressing.  That’s my funny story about Ranch Salad Dressing.

Sometimes I think I come up with some odd or unconventional ideas for meals and this is certainly an example. A few weeks ago, I started to make a vegan version of Ranch Salad Dressing.  The recipe can be found HERE on a blog called “Forks Over Knives”.   I decided to make a baked potato and I topped it with some mixed vegetables (from a bag of frozen), Ranch Salad Dressing, and hemp seeds.  Yep, sounds like an odd recipe and would you think I was even more odd if I told you I like this for breakfast?  It’s good!

So this is not much of a recipe but more of an idea for a ridiculously healthy, easy, and inexpensive plant-based meal.

BAKED POTATO TOPPED WITH MIXED VEGGIS AND RANCH DRESSING

Ingredients:

1 baked russet potato
About 3/4 cup cooked mixed vegetables
Vegan Ranch dressing *
Hemp seeds

* The Vegan Ranch Salad Dressing can be made with or without salsa which I discovered by accident (I forgot to add the salsa the first time I made the dressing... Oops!).  Above, you can see the dressing made without salsa which I prefer when topping baked potatoes.

I think you could really get creative with this meal idea.  Steamed broccoli and Ranch Dressing on a baked potato would be good.  I bet corn, black beans, diced avocado, and Ranch Dressing WITH Salsa would be another really good combination.  I bet I will come up with some other great combinations in the future. I’ll be sure to keep you posted!

Thursday, January 23, 2020

Mexican Lasagna (Vegan)


Mexican Lasagna (Vegan)

It was my husband who gave me the idea to try out a vegan diet.  In October, I had my annual physical and my blood work showed my cholesterol is high.  I have been maintaining a weight loss of about 30 pounds so I was hopeful my cholesterol levels would be better with all the changes I’ve made in my diet, but that was not so.  It occurred to me that I was eating a lot of animal protein and, upon my request, my doctor gave me 90 days to see if I could make some changes and lower my cholesterol levels on my own.  My doctor suggested I may just have “bad genes” or that my high cholesterol is “hereditary”, but I’d like to see what I can do.  I’ve been eating a plant based diet since mid-November 2019.  

I think my husband was really surprised to see how much energy I have had while eating a plant based diet.  I have not been hungry or tired or gained weight; these were my fears.  Actually I have lost weight and am having a really easy time keeping my weight steady eating this way.  

My husband finally decided to try out a plant based diet with me.  This is nice because we are eating the same things (I am not cooking separate meals for him like I have been for a really long time).  If I was just cooking vegan dishes for myself, I would be eating a lot of Indian and Chinese inspired dishes.  Now that I am trying to find recipes my husband and I will both like, we are making lots of Mexican Inspired meals.  

Here is a fun recipe we tried out... Mexican Lasagna.  I pretty much followed the recipe with just a few exceptions.  I used a red and yellow bell pepper instead of red and green. I omitted the cashew cheese sauce as well as the cilantro and olives.  I added a few pickled jalapeƱo slices in my lasagna layers.  I also warmed the refried beans with a little bit of salsa to make the refried beans easier to spread.  Finally, in place of the fresh tomatoes, I substituted a can of drained fire roasted tomatoes. The flavors in this casserole are really good.  The texture is rather soft.  I am learning that many vegan foods are soft in texture.  For us, what made this dish super was good was all the toppings we added to our individual portions.  Here our suggestions:

Shredded iceberg lettuce
Chopped tomatoes
Diced avocado
Crushed tortilla chips (we used blue corn tortilla chips)
Sliced black olives
Pickled jalapeno slices
Spicy Ranch Dressing (see recipe HERE).  Note: this recipe is great made with or without salsa.


This recipe comes from a great blog called “Dianne’s Vegan Kitchen”.  Here is the recipe link:


Here is a photo of my Mexican Lasagna.  It’s not very attractive looking but our individual portions with gobs of toppings looked great and were mighty tasty.  It was nice to have this big casserole in the refrigerator for a few days of leftovers which were easy to reheat in the microwave oven.