Showing posts with label vegan. Show all posts

Sunday, July 5, 2020

No Chop Chili - Vegan Version


No Chop Chili - Vegan Version with TVP


Top with with some Fritos corn chips... Yum!


I have been making a super simple chili that I call “No Chop Chili” for more than 10 years. The recipe is based on a “knock off recipe“ I found on the Internet; the chili is supposed to taste like the chili you get at Wendy’s Restaurants.  I made a few tweaks to the recipe and I just kept making it the same way over and over. Most of the times I have made this chili over the years, I made it with ground beef.  In the past few years, I’ve substituted ground turkey to make a lighter version.  This is a recipe I make for my husband at least once a month. The leftovers are great.

A number of months ago, I decided to switch to a vegan diet and my husband followed along a few months later.  He was craving the chili so we decided to make the chili with “Beyond Beef/Beyond Burger”, which is an item you might be able to find at your local grocery store.  Beyond Beef/Beyond Burger is a rather expensive item.  It’s a vegan meat substitute and is made from pea protein and other ingredients.  At my local store, it costs $9.99 for a one pound package.  When I make the No Chop Chili with the Beyond Beef/Beyond Burger, I make the chili following the original recipe, but I substitute half of the one pound package of Beyond Beef/Beyond in place of one pound of ground beef as described in the recipe (or I double the recipe and use the entire pound).  Here is the original No Chop Chili recipe which you could easily follow if you’d like to make the chili and substitute Beyond Beef/Beyond Burger (Click HERE for the original No Chop Chili recipe).  I like to make the recipe with just half the amount of Beyond Beef/Beyond Burger for two reasons: cost and taste.  My husband says a little of the Beyond Beef/Beyond Burger goes a long way. It does really give the chili a different flavor which he compares to the “flame grilled flavor” you might be able to imagine in some packaged foods.

My husband is very happy with the Beyond Beef/Beyond Burger version of the No Chop Chili.  Me? Not so much. I am not the biggest fan of the the “flame grilled flavor” and I also find the the smell and texture kind of weird. I am not knocking the Beyond Beef brand.  Like I said, my husband loves it.  I was hoping to make a vegan version of the No Chop Chili that was more like the chili I’ve been making for so long but I desired a different meat substitute.

I recently tried a new-to-me ingredient called Texturized Vegetable Protein (TVP). I thought it might be good in this recipe, I tried it out, and I LOVE IT.  I’ve already made it two times in the last few weeks.

Here it is:


No Chop Chili - Vegan Version with TVP

1 cup Texturized Vegetable Protein (TVP), I used Bob’s Red Mill Brand (See LINK)
2 1/2 cups water (divided)
1 beef style bouillon cube (I use a Not-beef Bouillon cube, Edward and Sons brand) See LINK
1 15−ounce can of dark red kidney beans (drained and rinsed)
1 15−ounce can of pinto beans (drained and rinsed)
1 8−ounce can tomato sauce
1 14.5-ounce can of diced tomatoes, fire roasted if available (liquid included)
1 4−ounce can of diced green chilies
1 1/2 tablespoons chili powder
1/2 tablespoon ground cumin
1/2 teaspoon salt
1 teaspoon sugar
1/2 teaspoon ground black pepper
1/2 teaspoon dried oregano
1/4 teaspoon garlic powder


1. Bring 1 1/2 cups water to a boil. I use a Pyrex measuring cup that is microwave safe to heat the water.  Dissolve the bouillon cube in the hot water; stir to combine.  Place the TVP in a medium sized bowl; pour the “beef” flavored broth over the TVP and set aside for about 10 minutes so that the TVP can absorb the liquid.
2. Add all of the remaining ingredients to a soup pot plus 1 cup of water.  Add the hydrated TVP to the pot including any liquid that was not absorbed by the TVP.  Stir to combine.
3. Cover the pot with a lid, bring to a boil, then reduce to a gentle simmer.  Simmer covered for about 20 minutes (stirring occasionally).

The chili is good by itself.
It’s even better topped with some diced fresh onion (we use sweet onion).
Better yet... top the chili with diced fresh onion and some dairy-free cheddar style cheese (I like Daiya brand).
If you want to get a little decadent, place a handful of Frito brand corn chips in your chili (Yep! The original Frito corn chips just happen to be vegan!).  Pretty much any corn chip is good in the chili.  Of course, little oyster crackers or saltines are good in the chili as well.

Enjoy!


Saturday, July 4, 2020

Vegan Mac and Cheese


Vegan Mac and Cheese


I stumbled across this recipe a few months ago and I am really happy I did.  The recipe is for a dry cheese sauce mix you make in your blender or food processor and you store the mix in your refrigerator so it’s ready when you want to make a vegan version of Mac and Cheese.  To make the Mac and Cheese, you add 1/3 cup of the dry mix to 1 cup of plant-based milk and you warm it in a skillet.  Once thickened, you add in cooked pasta and stir it all to combine.  It’s a super easy recipe and I think it’s just delicious.  The recipe claims to be like boxed Mac and Cheese that many of us grew up having, but I don’t really think that is true.  But I really enjoy this dish.  I like to top my Mac and Cheese with hemp hearts and vegan Parmesan cheese.  I’ll post the vegan Parmesan cheese recipe below as well.  When I make this recipe, I always make up some mixed vegetables that I almost always have in the freezer.

As always, I tweak recipes a bit based upon ingredients I have or don’t have.  The cheese sauce mix recipe calls for tapioca flour but I substitute an equal amount of arrowroot powder.  Also, the cheese sauce mix calls for oat flour and I used an equal amount of instant/quick cooking oats.  Below you will see instructions for how to make the cheese sauce into Mac and Cheese.  The recipe calls for 1 cup of pasta.  I think I use slightly more than that (I make three servings of pasta which is about 165 grams of pasta and I use 1/3 cup of the Cheese Sauce Mix and 1 cup of almond milk).

Here is the link for the Cheese Sauce Mix.


Mac and Cheese Sauce Mix Recipe

Here's a healthy vegan alternative to the kind of mac and cheese mix that comes in a box. This one's based on cashews, nutritional yeast, and seasonings.
Ingredients
  • 1 cup cashews
  • ¾ cup nutritional yeast
  • ¼ cup oat flour
  • ¼ cup tapioca flour
  • 1 tablespoon paprika
  • 1 tablespoon organic sugar
  • 2 teaspoons powdered mustard
  • 2 teaspoons sea salt
  • 2 teaspoons onion powder
Instructions
  1. Add all of the ingredients to a food processor and process until a powder is formed. There should not be any discernible chunks or large granules of cashews, so this may take 3 to 4 minutes of processing.
  2. Store this in a jar or portion out into 1⁄3-cup increments and put in ziplock bags and store in the pantry for a month or two or in the refrigerator for up to 6 months.

How to use this mix
Cook 1 cup of dry macaroni according to package instructions and drain. Combine 1⁄3 cup mix with 1 cup water or unsweetened nondairy milk in a saucepan over medium-low heat. Whisk well and bring to a boil. Simmer for 1 minute, then toss with hot cooked macaroni.
This mix is also a great answer for turning yesterday’s leftovers into a quick casserole. Just combine leftover pasta, potatoes, or grains, some veggies, and any other odd scraps you think might be a good fit and mix it in a casserole dish with some of the cheese mix and water.
You can add additional spices and herbs if you wish. Then bake it all up into creamy goodness. You can also use the mix to make quick sauces for veggies or add it to soups for extra cheesy flavor and richness—it’s quite versatile.

Here is the link for the Vegan Parmesan Cheese


Vegan Parmesan Cheese Recipe

INGREDIENTS

  • 1 cup (150g) Raw Cashews*
  • 1/4 cup (15gNutritional Yeast Flakes
  • 1/2 tsp Garlic Powder
  • 3/4 tsp Sea Salt

INSTRUCTIONS

  1. Add the ingredients to the food processor and pulse it on the S blade until it reaches a fine consistency.
  2. Keep it in a sealable jar in the refrigerator where it will keep for weeks!
  3. Sprinkle it on pastas, pizzas, casseroles, salads and anywhere else you can possibly think of!


Friday, July 3, 2020

Homemade Almond Milk


Above:  Pampered Chef’s Deluxe Cooking Blender

Making Homemade Almond Milk

Just before the Corona Virus started spreading across the United States, I attended a Pampered Chef party. My friend, Belinda, is now a consultant for Pampered Chef.  I ordered Pampered Chef’s Deluxe Cooking Blender. It’s a pretty amazing gadget.  You can actually cook soup in the blender.  You can make jam in the blender.  You can grind wheat berries into flour, nuts into nut butters... why you can even grind coffee.  You can make milk out of rice, oats, almonds, cashews, and coconut.  The blender even has a “heated wash” setting so it kind of cleans itself.  I have been having fun finding more and more uses for my new toy  vital cooking implement.  

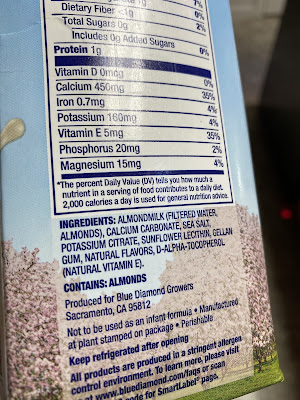
I’ve made almond milk, cashew milk, and also oat milk in the blender.  Almond milk is my favorite and it was something I routinely bought at the store before I got the blender.  I would also like to try to make rice milk and coconut milk in the future.  My dad asked me if I was saving money by making the almond milk at home.  I can get a three pound bag of raw almonds (9 cups of almonds) at my local Sam’s Club for just under $12.00.  With this I can make 9 quarts of almond milk.  Nine quarts of almond milk at my local grocery store would cost over $18.00. So yes... I am realizing a cost savings by making almond milk at home, but I must also factor in the cost of the fancy schmancy blender.  I do also like the fact that the almond milk I am making contains just two ingredients: almonds and water.  Below I’ve posted some photos of the labels from the almond milk I used to purchase and you will see the store bought, shelf-stable almond milk does contain a number of other ingredients.

So how to you make almond milk in a Deluxe Cooking Blender?  It’s super simple.

Soak 1 cup of raw whole almonds in a few cups of water for about 4 hours.
Drain and rinse the almonds in a mesh sieve. Discard the water used to soak the almonds.
Place the almonds in the Deluxe Cooking Blender along with 5 cups of fresh water.
Set the blender to the “ALT MILK” setting and allow it to run (the cycle runs for 5 minutes).
Pour the milk into a fine mesh bag (the bag below came with the blender).
You do end up having to squeeze the bag to get all the milk out.  
I store the almond milk in the refrigerator in a recycled glass jar.  Almost all of it fits in the jar I have except for about 1/4 cup. 


Above: Draining the milk in the mesh bag.


Above: Almond Milk all done and ready for the refrigerator.


Here are some photos of the last of my store bought almond milk.  I do like that the almond milk I am making at home just contains water and almonds. 


Friday, June 19, 2020

Shelf-stable Silken Tofu


Shelf-stable Silken Tofu

Whoa!  Where has the time gone.  I have not posted anything here for months.  You would think with the pandemic going on, I’d have so much time to write, but I guess I have just been doing lots of other things.
I have been cooking a ton, baking a little, and knitting a lot.  My cooking/baking has all been vegan and my knitting has all been socks. Socks, sock, socks.  

At the very beginning of March just as Coronavirus was popping up in America, my husband and I had a fun time attending a vegan cooking class with JL Fields at the Colorado Springs Vegan Cooking Academy (Colorado Springs, Colorado).  At the class, we made and sampled Onion “Fondue”, Chocolate Pudding, Baked Vegan Ricotta Kale Dip, Tarte Flambees, and Fleischschnacka.  Everything was delicious and vegan of course. 

The Chocolate Pudding was made with shelf-stable firm silken tofu.  Since it is shelf-stable, it is NOT in the refrigerated section of the grocery store and it is not packed in water like other tofu you may have seen.  At my favorite natural grocery store (Natural Grocers/Vitamin Cottage), I got two boxes of the silken tofu before we hunkered in at the beginning of the pandemic.  

Let me show you what I made with the silken tofu.


From a blog called “Clean and Delicious”

CLEAN EATING PUMPKIN PIE MOUSSE


We enjoyed the Pumpkin Pie Mousse a few different ways.  At the grocery store, in the freezer section right next to the Cool Whip, I found a vegan dessert topping called “Truwhip”.  I also enjoyed the Pumpkin Pie Mousse with plain Silk brand soy yogurt and some homemade granola.


Chocolate Pudding: a recipe from the JL Fields cooking class we attended.

Chocolate Pudding
6 ounces silken firm tofu
2 tablespoons pure maple syrup
2 tablespoons unsweetened cocoa powder
1/2 teaspoon pure vanilla extract

Add all the ingredients to a food processor, pulse quickly to achieve a smooth, thick consistency. Scrape down the sides of the food processor bowl as necessary.  Transfer to a bowl and refrigerate overnight before serving.  

The Chocolate Pudding was also great with the Truwhip. 
 I also liked the Chocolate Pudding with sliced bananas.


From a blog called “The Happy Herbivore”

INSTANT VEGAN ALFREDO


I cut this recipe in half when I made it.  I am glad that I did. The sauce is fantastic when it is freshly cooked but it does dry up quite a lot so the leftovers are not as good. Perhaps the pasta absorbed the liquid from the sauce as it sat in the refrigerator.  

So there you have it... three recipes made from shelf-stable silken tofu.  I enjoyed them all very much.


Thursday, March 26, 2020

My New Favorite Granola (Vegan) and Some Other Great Recipes I’ve Been Making


Yogurt Parfait with homemade soy yogurt, banana, and homemade granola

I really have been cooking a ton lately; I just have not been posting about it.  I switched to a plant-based/vegan diet in November 2019, and my husband joined me a few months later.  We have found that it is possible to eat out and stick with plant-based eating, but the options are limited.  Now that we are living in the time of the Corona Virus Pandemic, we are making and eating all of our meals at home.  Thankfully, I enjoy cooking and baking as much as I do.

We are making an effort to go to the store as little as possible as the Corona Virus is spreading across Colorado.  Testing has been extremely limited in our town; it’s unsettling to think that the number of people infected is far greater that what the figures on the nightly news are showing.  Staying in is a good idea and I also feel it’s socially responsible.  

So... what have I been making lately?  

Here is a granola recipe I tried recently.  I have actually made it twice because it’s so good.  As you can see in the photos, I am using this granola to make fruit and yogurt parfaits.

GRANOLA:


I like to make the parfaits with my homemade soy yogurt:

YOGURT:


I made some of the parfaits with homemade Crock Pot Applesauce:


Homemade applesauce, homemade yogurt, and homemade granola.  Yum-o!


Healthy Shamrock Shake

Around St. Patrick’s Day, I kept seeing green smoothies on Facebook and Instagram.  I tried a recipe called “Healthy Shamrock Shake” and I really like it.  I left out the chocolate and I discovered my Peppermint Extract is extremely old, but it still worked.

HEALTHY SHAMROCK SHAKE:


I am also currently cooking my way through a great cookbook by a local woman, J L Fields.  The cookbook is called “Fast & Easy Vegan Cookbook”.


I am obsessed with this cookbook. The orange tabs mark the recipes I have tried already.  Some of the recipes are so great that I have already made them multiple times.

Let me show you some of the recipes I’ve made from the book. I don’t feel I should share the recipes themselves. I’ve not always been entirely conscientious about that but sharing the recipes directly from the book does violate the rights of the cookbook author. 


Breakfast Smoothie Bowl


Homemade Calzone.  This recipe is actually my creation but the “vegan ricotta cheese” in the calzone is a recipe from the cookbook.  The recipe is called “Ch-ofu Ricotta” because it’s made from chickpeas and ricotta.  In my opinion, it’s WAY better than ricotta cheese.


The pita above is inspired by a recipe in the book.  Homemade pita, homemade jalapeño hummus, and shredded lettuce.  Such a great and easy meal.


Above:  Falafel Burgers and Ranch Dressing (made with soy yogurt)


Spinach-tofu Casserole


Avocado-Black Bean Medley (it’s a massaged kale salad and the toppings are ingredients you’d use to make guacamole... avocado, tomato, lime, onion).  

The cookbook can be found here and other places.  Obviously, I’m a huge fan:

Cookbook Link:


J L Fields also has a blog and you can find many recipes there as well; here is a link:


I hope you and yours are all doing well during this uncertain time.  Stay safe and healthy.


Wednesday, March 4, 2020

Homemade Soy Yogurt Slow Cooker (Vegan)


Homemade Soy Yogurt made in the Crock Pot (Slow Cooker)


Several weeks ago, I bought soy yogurt for the first time to make a Buffalo Chickpea Pizza recipe. The recipe called for making Ranch dressing with the soy yogurt to drizzle on the pizza after baking. I love the pizza recipe but I really love the Ranch salad dressing recipe. I’ve been making it over and over ever since I tried it.

I was a tad worried when I bought the soy yogurt. First I worried I would not like it and it would go to waste.  I only need about 1/2 a cup and I could only find a big tub of it.  The tub I got contained less yogurt (as compared to the plain cow’s milk yogurt I used to buy) and it was more expensive.  I want to say the price for the three cup tub of yogurt is $5.79. The other thing I noticed about the soy yogurt (Silk brand) is that it contained a lot of added sugar.  It got me to thinking... if I have made cow’s milk yogurt in the slow cooker in the past, why not try soy yogurt?!

I started researching vegan yogurt recipes. At first I found recipes that called for pro-biotic capsules that could purchased on line.  What I found was big bottles for $44.00 when I just needed one or two capsules. Then I saw recipes calling for acidophilus and that sound familiar (as in... maybe I could find that at WalMart for less than $44.00).  I kept searching and I found a recipe and instructions that called for a small tub of store bought yogurt with live/active cultures and the adding it to warmed soy milk.  Basically, this is the exact method I used when making cow’s milk yogurt a few years back.  I made it Monday and it worked. And it’s delicious.  I am also happy that it is less expensive than the store bought soy yogurt, it contains less sugar, and overall it containers fewer additives and ingredients which, in my mind, makes it a little more wholesome.


Here is the tutorial I followed for making my homemade soy yogurt. The most important things I can point out is to look fo soy milk and yogurt which contain as few as ingredients as possible.  Specifically, look for soy yogurt which contains only soybeans and water.  Also, you must ensure the yogurt you use contains live/active cultures.  I had a hard time finding mention of live/active cultures on the Silk brand soy yogurt.  It was sort of hidden in the list of ingredients.


http://greenleavesandjam.com/the-easiest-crock-pot-homemade-yogurt-vegan-plant-based/


I made my homemade yogurt into some overnight oats.  Above you can see it with banana and natural peanut butter.  This is my favorite combination.  Overnight oats could not be easier to make.  You can make them a bazillion different ways but adding different toppings. 

 Here is the basic OVERNIGHT OATS recipe:

3/4 cup plain, unsweetened yogurt
3/4 cup milk of your choice (I used unsweetened almond milk)
1/2 cup rolled/old fashioned oats
2 tablespoons chia seeds
A splash of pure maple syrup (more or less depending how sweet you like things)
A splash of vanilla

Combine all ingredients in a bowl and stir to combine.  Refrigerate overnight (or at least a few hours) and top as desired.  Thawed frozen berries, jam, banana, nut butters, coconut, chopped nuts... the possibilities are endless.  You can experiment with other flavors... in place of vanilla, try almond extract for example.   

I typically eat overnight oats cold but they can also be enjoyed hot; just warm in the microwave oven as desired.


Tuesday, February 25, 2020

Vegan Ranch Dressing (Soy Yogurt)


Ranch Dressing 

I’ve never been one to put Ranch salad dressing on everything... until recently.  Several weeks ago, I made a pizza recipe called “Buffalo Chickpea Pizza with Ranch Dressing” from a blog called “The Stingy Vegan”.  I really enjoyed the pizza but I absolutely love, love, LOVE the Ranch Dressing from the recipe.  It’s made with soy yogurt (I use Silk brand plain yogurt) and a bunch of dried herbs and spices. I’ve been tweaking the recipe a bit to suit my preferences (a little less of this and that) and I’ve been enjoying it with many dishes.  

Above... Everything But The Bagel Tofu and salad.

Below... taco salad with pinto beans, brown rice, avocado, tomatoes, Ranch dressing, and there’s a bunch of salad under all of that.


Below... Buffalo Chickpea pizza with ice berg lettuce, Ranch Dressing, hemp seeds, and green onions.


Below... roasted potatoes, ice berg lettuce, Buffalo Chickpea pizza, green onions, Ranch dressing, and hemp seeds.


Below... baked potato, mixed vegetables, hemp seeds, and Ranch dressing.


Here’s my modified version of the Ranch Salad Dressing 
(Inspired by a recipe found on “The Stingy Vegan”):

1/2 cup (112 grams) plain soy yogurt (I use Silk brand)
1/2 teaspoon dried parsley
1/2 teaspoon dried chives
1/4 to 1/2 teaspoon kosher salt
1/4 teaspoon dried dill
1/4 teaspoon garlic powder
3/4 teaspoon dehydrated onion/dried chopped onions
2 to 3 tablespoons plant based milk (I use unsweetened plain almond milk)

In a small bowl, combine the yogurt with all the dried herbs/spices.  Stir well to combine.  Add the milk and stir again until smooth and creamy.  Refrigerate leftovers.  

Monday, February 24, 2020

Carrot Cake Muffins (Gluten Free and Vegan)


CARROT CAKE MUFFINS

I made some blueberry muffins (see link below) they other day and they turned out great.  I made a few changes to make the muffins vegan (swapped out soy yogurt for cow’s milk yogurt and used flax egg in place of regular eggs).  The muffin had a nice dense, moisture texture and I instantly thought that I would like to try to make this muffin with different ingredients since I liked the muffins so much.  Today was my attempt at a Carrot Cake Muffin and the results were great!  These muffins are gluten free, oil free, and vegan.  Today I made both the blueberry version and the carrot cake version and now my freezer is well stocked with healthy and easy snacks.

Carrot cake muffins

Inspired by a recipe on www.glutenfreeonashoestring.com


INGREDIENTS

2 1/4 cups (225 g) certified gluten free old fashioned rolled oats (or regular rolled oats if GF is not an issue)
1/2 cup (80 g) granulated coconut palm sugar (or light brown sugar)
1 1/2 teaspoons baking powder
1/2 teaspoon baking soda
1/4 teaspoon kosher salt

1 1/2 teaspoons ground cinnamon

3/4 teaspoon nutmeg, freshly grated if you have it
1 cup (240 g) smooth applesauce, at room temperature
1/2 cup (114 g) plain yogurt (I used Silk brand soy yogurt), may use any other plain yogurt if desired
2 flax eggs (combine 2 tablespoons ground flax need/ground flax seed with 5 tablespoons water, let it rest for about 10 minutes before adding to the dry ingredients), may use 2 eggs if desired

1 teaspoon vanilla extract
1 cup coarsely grated carrot (about 2 medium carrots), I used my box grater

1/2 cup pecans, chopped

1/4 cup raisins

  • Preheat your oven to 325°F. Grease or line the wells of a standard 12-cup muffin tin, and set it aside.
  • In a blender (or food processor fitted with the steel blade), place the oats and process into a fine powder. If you’re using coconut palm sugar, place that in the blender, too, and process it too. Pour the oat flour mixture into a bowl. Add in the baking powder, baking soda, salt, cinnamon, and nutmeg.  Stir to combine.

    Create a well in the center of the dry ingredients and add the applesauce, yogurt, flax eggs, and vanilla, and mix nearly combined. Add the carrots/pecans/raisins and mix gently until these ingredients are evenly distributed throughout the batter. The batter will be thick but very soft. Divide the batter evenly among the prepared wells of the muffin tin. Shake the tin back and forth to evenly distribute the batter in the wells.
  • Place the tin in the center of the preheated oven and bake until the tops of the muffins are nicely domed and they spring back when pressed gently with a finger, 20 to 22 minutes. Remove from the oven and allow to cool for about 10 minutes in the tin before transferring to a wire rack to cool completely.


Tuesday, January 28, 2020

Sugar Cookies with Lemon and Nutmeg (Vegan)


Sugar Cookies with Lemon and Nutmeg (Vegan)

Now that my husband has joined me in a plant based/vegan diet, we are seeking out lots of new recipes.  My husband has quite a sweet tooth so I make a treat to have in the house now and again and he’s trying to be good about limiting his portions.  Of course I enjoying having any excuse to bake and try new recipes.

I asked him what sweet treat he wanted after we finished off some yummy and healthy blueberry muffins the other day.  He said, “Sugar Cookies!”  Most vegan sugar cookies I found call for vegan butter or vegan buttery spread.  I’ve never purchased these items so I looked for a recipe which used oil instead of “butter”.  I found a great looking recipe on a blog called “The Mostly Vegan” and the recipe turned out great.  Here is the recipe link:


As if often the case with me, I decided to modify the recipe.  The sugar cookies I typically make are my husband’s Grandma’s recipe.  Unlike many sugar cookie recipes, Grandma’s recipe does not contain vanilla or vanilla extract; instead the cookies are flavored with finely grated fresh lemon zest and ground nutmeg.  The new recipe I was using called for vanilla so I just left that out. The new recipe I was using also called for adding colorful sprinkles to the cookie dough so the sprinkles were dispersed all through the dough.  I think that idea is brilliant but I had a feeling my husband would not like that.  So in my version of the cookies, I did not add any sprinkles to the dough but I added some colored sugar to the tops of my cookies as you can see in the photos.  

I am looking forward to making the new recipe again and will try it out with the sprinkles IN the dough. I think my friends at my fabulous local yarn store (Yarned & Dangerous, Canon City, Colorado) will like the colorful cookies!


Sugar Cookies with Lemon and Nutmeg
Based on a recipe found on “The Mostly Vegan” blog; Original recipe can be found here:


  • 2 cups unbleached, all-purpose flour
  • 1 teaspoon baking powder
  • ¾ teaspoon baking soda
  • 3/4 teaspoon coarse kosher salt (if using a finer grain salt, use just 1/2 teaspoon salt)
  • 1/2 teaspoon ground nutmeg (freshly grated if you have it)
  • 1 cup organic cane sugar
  • ½ cup neutral vegetable oil 
  • ¼ cup water
  • 1 teaspoon apple cider vinegar
  • finely grated lemon zest/peel from one small to medium sized lemon (I used a Microplane grater to finely remove/grate the yellow part only) 
  1. In a large bowl, whisk together flour, baking powder, baking soda, salt, and nutmeg. 
  2. In a separate bowl, whisk together sugar with oil, water, apple cider vinegar, and fresh lemon zest until smooth and incorporated.
  3. Add wet ingredients to the flour mixture and stir until well combined.  At this point you can refrigerate the dough or bake it right away. The original recipe suggests refrigerating the dough first so that the cookies do not spread too much while baking. I baked my cookies right away without first chilling the dough and I am happy with how the cookies turned out.
  4. Preheat the oven to 375 F. Line cookie sheets with parchment paper. Use an ice cream scoop or 2 tablespoon measuring spoon to portion dough into small mounds. Press down gently on the mounds with your palm to flatten slightly. Decorate the top of each cookie as desired (sprinkles, colored sugar, whatever you prefer on your sugar cookies).
  5. Bake for 8 to 10 minutes. The cookies should be puffed up and very lightly browned on the bottom (but not on the edges or tops). Remove from oven and allow to cool on the pan for 2 minutes before removing to a cooling rack. Repeat with remaining cookies.  
  6. Cookies will deflate slightly while cooling. Store in an airtight container for up to 5 days.


Saturday, January 25, 2020

Oatmeal Blueberry Muffins (Vegan)


Oatmeal Blueberry Muffins (Vegan)


This recipe comes from a blog called “Gluten Free on a Shoe String”.  Here is the recipe link:


I’ve been making a few sweet treats lately.  For me, it’s always fun to see if I can make a healthier version of something.  For this recipe, I also had to swap out a few ingredients to make the muffins vegan.  For the eggs called for in the recipe, I used flax eggs. I combined 2 tablespoons of ground flax seed/flax seed meal with 5 tablespoons of water and let it sit together to “gel” for about 10 minutes before adding in the other wet ingredients.  The recipe also calls for Greek yogurt.  This week I purchased a tub of Silk brand plain yogurt which is made from soy milk.  Since Greek yogurt is much thicker than the soy yogurt, I did allow the soy yogurt to drain a little bit before using it in the recipe.  I put some paper towels in a fine mesh sieve. The yogurt really did not drain, but the paper towel did wick away quite a lot of moisture.  Next time I want to drain yogurt, I think I will try a coffee filter instead of paper towel.  

With the modifications I’ve noted above, my muffins turned out great!  They are dense and moist and have just the right amount of sweetness to me.  I like it very much when I find a muffin with a great texture and I can see how I could easily swap ingredients to make different varieties.  I can see this being a great carrot cake muffin or perhaps apple and cinnamon.  I only tried these muffins after they had cooled.  My husband said the muffins did not have a good texture when they were still very warm right out of the oven; he says the texture is much better once the muffins have cooled.  I bet these muffins will also freeze very well... if there are any left in a few days.  

Healthy blueberry muffins

Modified from a recipe found on www.glutenfreeonashoestring.com”

INGREDIENTS

2 1/4 cups (225 g) certified gluten free old fashioned rolled oats (or regular rolled oats if GF is not an issue)
1/2 cup (80 g) granulated coconut palm sugar (or light brown sugar)
1 1/2 teaspoons baking powder
1/2 teaspoon baking soda
1/4 teaspoon kosher salt
1 cup (240 g) smooth applesauce, at room temperature
1/2 cup (114 g) plain Greek-style yogurt (1%, 2% or 0% fat—but I prefer 2%), at room temperature I substituted an equal amount of Silk brand plain yogurt which is made from soy milk.
2 eggs (100 g, weighed out of shell) at room temperature, beaten I substituted flax eggs (I combined two tablespoons of ground flax seed and five tablespoons of water and let it rest for about 10 minutes before adding it to the wet ingredients.
1 teaspoon pure vanilla extract
About 3/4 cup fresh (or frozen) blueberries 
  • Preheat your oven to 325°F. Grease or line the wells of a standard 12-cup muffin tin, and set it aside.
  • In a blender (or food processor fitted with the steel blade), place the oats and process into a fine powder. If you’re using coconut palm sugar, place that in the blender, too, and process it too. Create a well in the center of the dry ingredients and add the applesauce, yogurt, flax eggs, and vanilla, and mix until just combined. Add the blueberries and mix gently until the blueberries are evenly distributed throughout the batter. The batter will be thick but very soft. Divide the batter evenly among the prepared wells of the muffin tin. Shake the tin back and forth to evenly distribute the batter in the wells.
  • Place the tin in the center of the preheated oven and bake until the tops of the muffins are nicely domed and they spring back when pressed gently with a finger, about 18 minutes. Remove from the oven and allow to cool for about 10 minutes in the tin before transferring to a wire rack to cool completely.