Showing posts with label cooking. Show all posts

Thursday, June 21, 2018

Spicy Meatball Soup with Beans


This is an updated version of a soup I've been making for my husband for years.  The original version included carrots and celery, as well as diced russet potatoes.  My husband is trying to avoid white carbs (starchy white potatoes, white rice, and white bread) so he asked if I could make a version of this soup without the potatoes.  We added in canned beans in place of the potatoes since beans are high in fiber. I am thinking they might be a little healthier than starchy potatoes. 

Another thing I did to make this soup a bit more healthy is to make the meatballs with some ground turkey and pork sausage as opposed to ground beef and pork sausage.  More importantly, I am baking the meatballs in the oven before adding them to the soup.  In the original recipe, I added the raw meatballs into the soup and cooked them in the simmering broth.  By baking the meatballs before adding them to the soup and allowing the meatballs to drain or render off some of their fat before adding them to the soup, this soup should be lower in fat than the original recipe.

You can see the original recipe HERE.

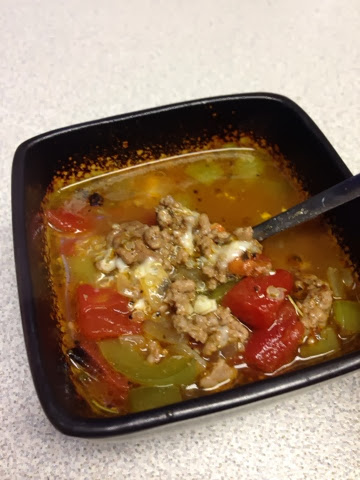
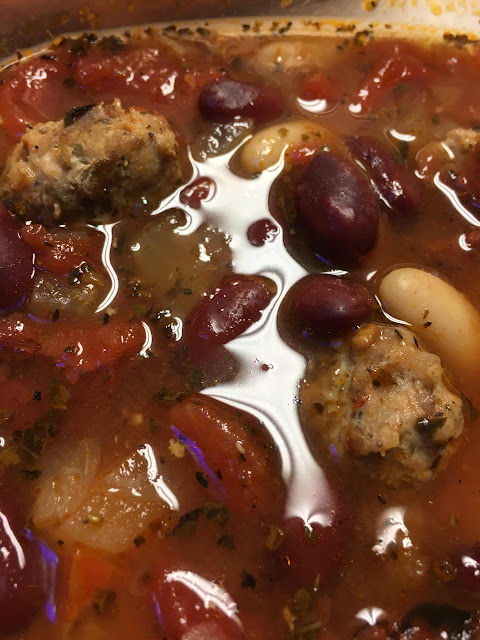
And here is the updated version... my husband really loves it!

Spicy Meatball Soup with Beans

Spicy Meatball Ingredients:
1/2 pound bulk, ground hot Italian sausage (I used Johnsonville brand)
½ pound lean ground turkey
4 teaspoons Italian seasoned bread crumbs (plain bread crumbs can be substituted)
1 egg
1 tsp. dried oregano
1 tsp. dried basil
½ tsp. salt
¼ tsp. ground black pepper

Soup Ingredients:
1 to 2 tsp. extra virgin olive oil
1 small onion, finely diced (I used a sweet onion)
1 carton beef broth (4 cups / 32 ounces)
2 cans fire roasted diced tomatoes (14.5 ounce size)
1 cup water
1 ½ tsp. dried oregano
1 ½ tsp. dried basil
2 bay leaves
1 tsp. granulated sugar
1 tsp. salt (I used kosher salt)
1/2 tsp. ground black pepper
1/2 tsp. garlic powder
1 can (15.5 ounce) dark red kidney beans
1 can (15.5 ounce) cannellini beans (white kidney beans)

1. In a medium sized bowl, combine ingredients for meatballs (hands work good for incorporating all ingredients). Line a baking sheet with a brim with aluminum foil and spray the foil with non-stick cooking spray.  Preheat oven to 350 degrees Fahrenheit.  Make mini-meatballs (approximately 1/2 tablespoon in size) and place on foil lined baking sheet. The mini-meatballs do not need to be rolled into perfect balls; the important things are (1) making them similar size so they cook evenly and (2) making them easy to eat in one bite.  Bake the mini-meatballs in preheated oven for 10 minutes.

2. Meanwhile, heat the olive oil in a large pot over medium heat; add the onion, and cook, stirring occasionally, until the onions are tender (about 4 or 5 minutes).  Add in the spices listed under soup ingredients (except for the bay leaves) and cook for an additional minute or two, stirring frequently, until the onions are coated with the spices. Add the beef broth, the canned tomatoes, and the bay leaves. Bring to a boil, cover with a lid, and reduce to a simmer until the meatballs are done.

3.  When the meatballs are done, transfer the cooked meatballs to a clean work surface which has been covered with a few layers of paper towels (I spread some paper towels on a cutting board).  Roll the meatballs around a bit to wick away some of the fat which has rendered from the meatballs.  Add the meatballs and the beans to the pot.  Allow the pot of soup to simmer for about 15 minutes.  Remove the bay leaves and enjoy!

Thursday, December 8, 2016

Broccoli For Breakfast


Broccoli for Breakfast

I would have never thought to have broccoli for breakfast until I saw the idea on Facebook.  I am part of a super huge Facebook group right now; all participants (over 29,000 people!) have committed to a 3 1/2 month fitness program with Autumn Calabrese.  Autumn is the creator of the Beachbody program called "21 Day Fix" and other workout programs.  The challenge started December 5th, and the participants will first do the "21 Day Fix" workouts for 21 days, followed by the program called "The Chisel".  After that, we will complete "21 Day Fix Extreme" and we will wrap it all up with Autumn's new dance exercise program called "Country Heat".  Anyway, one lady in the group posted a photo of her breakfast... scrambled eggs with broccoli, ham, and cheese.  I gave it a try and I loved it.  I used precooked turkey sausage instead of ham.  I use about 1 cup of steamed broccoli; I put about 1/2 cup in the eggs and have the remaining 1/2 cup on the side.

I really recommend you try this... sausage and eggs... good.  Broccoli and cheese... good. Put them all together... GREAT!  This is not much of a recipe but here you go...


Broccoli for Breakfast

1/2 to 1 tsp. coconut oil or olive oil
1/2 cup steamed broccoli, break florets in to small bits
2 eggs, scrambled
1 link precooked turkey breakfast sausage (I use Johnsonville brand), diced
1 slice (Sargento brand) Ultra Thin cheddar cheese
salt and pepper to taste

Warm oil in a medium sized skillet over medium to medium high heat.  Add the broccoli and precooked sausage; saute for 2 or 3 minutes to warm through, stirring occasionally.  Add in eggs and cook to desired doneness.  Season with salt and pepper and top with cheese slice.

Enjoy!


Thursday, October 13, 2016

Turkey Pesto Burgers: 21 Day Fix Friendly


Turkey Pesto Burgers


Jennie-O Ground Turkey was on sale for $2.99 this past week.  I stocked up!  I did not plan my meals very well this week; instead I stocked up on items which were on sale.  Thankfully I came up with an idea for something I could make with a least one pound of ground turkey; this will make four meals for me and the recipe calls for just a few ingredients. I considered adding veggies into the burger mix, but decided to keep it simple.  The pesto I used is Kroger Brand "Private Select" Basil Pesto and it has a very wet consistency; I added in some quick or instant oats so that the burgers would hold together well.  The burgers did hold together well while grilling in my grill pan. I was surprised how the addition of oats really changed the texture of the burgers.  I would say it made the burgers very tender and, since I did not add in any grated or diced veggies, the texture was also very smooth. I decided to top my burger with some garlicky tomato sauce (Barilla brand Roasted Garlic Natural jarred tomato sauce) and a little grated mozzarella cheese.  I plan to make this meal again but next time I'll make up some zucchini noodles (zoodles).  I think these burgers would also be great on a bun.  I did not add any salt to my burgers but I think a few pinches of salt would have been good, so I did add a pinch of salt to the list of ingredients below. 

Turkey Pesto Burgers (Serves 4)

1 pound lean Jennie-O brand ground turkey, 93 percent lean
1/4 cup plain quick or instant oats
2 tablespoons prepared basil pesto
A pinch of salt

Directions

Mist a large skillet (or grill pan) with cooking spray and preheat over medium high heat.  In a large bowl, combine all ingredients.  Mix gently with hands to distribute the ingredients and shape into 4 equal patties, less than 1/2 inch think.  Add patties to preheated skillet (or grill pan), reduce heat to medium, and cook until bottoms are deep golden brown, about 4 to 5 minutes.  Flip and cook until patties are firm to the touch and cooked through (no pink remains), about 4 to 5 minutes more. 

If desired, serve with some warmed tomato based pasta sauce and a little mozzarella or Parmesan cheese.


Sunday, March 27, 2016

Ancho-Chile Crusted Pork Tenderloin with Cilantro-Lime Quinoa and Fresh Pico de Gallo

I made up this nice plate for myself and snapped this photo with my iPhone as I sat down to eat my meal.  Just after I took this photo, I dropped my iPhone into my plate of food.  Doh!  Don't do that, but do try this recipe.  It's good!

Ancho-Chile Crusted Pork Tenderloin with Cilantro-Lime Quinoa and Fresh Pico de Gallo

We are trying to eat healthier and focus on lean protein with fresh fruits and vegetables, and we are trying to stay away from the carbs we love so much: bread, pasta, tortillas, etc.  For some recipe inspiration, I flipped through a magazine from 2014.  


I found a pork tenderloin recipe; I knew my husband would NOT go for the Pineapple-Papaya Salsa, so I made Fresh Pico de Gallo instead.  I also made up some Cilantro Lime Quinoa.  When I try a new recipe, I always wonder if it's going to be a flop, but my husband really LOVED this recipe.  He ate all the leftovers so we got 5 servings out of this recipe.


You can see the spice rub in the photo above.  I had all the ingredients on hand which is always nice. I thought I had purchased a PLAIN pork tenderloin but when I was opening up my packaged tenderloin, I saw it was called "original" (looks like it was pre-seasoned).  I did rinse my pork tenderloin under cold running water to remove some of the "goo" from the packaging and patted the tenderloin dry with paper towels before coating it with the spice rub.

Ancho-Chile Crusted Pork Tenderloin

1 pork tenderloin (I used Hormel brand: 1.5 pounds, the label read "original")
2 teaspoons chili powder
1 teaspoon salt (I used kosher salt)
1 teaspoon black pepper
1 teaspoon ground ancho chile pepper
1 teaspoon ground cumin
1 teaspoon dried oregano

Combine all the seasonings in a small bowl.  Sprinkle over pork tenderloin (see notes above); coat the entire tenderloin with the spice mixture.  Place tenderloin in a gallon sized zip close bag and refrigerate for several hours or overnight. 

Pre-heat oven to 425 degrees.  Place pork loin in a baking dish (I used a 13" x 9" x 2" glass Pyrex dish).  Bake for about 35 minutes or until the pork reaches an internal temperature of 145 to 155 degrees Fahrenheit.  I was in a hurry to get this on the table so I cooked this at 425 degrees.  The original recipe calls for cooking the pork tenderloin on the outdoor grill. 

Cilantro Lime Quinoa

1/2 cup quinoa, well rinsed
1 cup water
pinch of kosher salt
a few tablespoons of finely chopped cilantro leaves
the finely grated zest of 1 lime
the juice of half a lime

Bring the water and the pinch of salt to a boil.  Add in quinoa, cover with a lid, reduce to low; simmer for 17 to 20 minutes, without removing the lid on the pot.  When done, add in the cilantro, lime, zest, and lime juice from 1/2 a lime; fluff and stir with a fork.

Fresh Pico de Gallo

4 or 5 fresh Roma tomatoes, seeds and pulp removed, finely diced
1 fresh jalapeno, seeds removed, finely diced (use less if you don't like spicy)
1 fresh clove of garlic, finely minced
the juice of half a lime
1/2 of a small onion, I used a sweet Vidalia onion, finely diced
a few tablespoons of finely chopped cilantro leaves
salt and freshly ground pepper to taste
a few pinches of granulated sugar to offset the spice/heat

Combine all ingredients in a medium sized bowl; toss with a fork to combine.


Sunday, February 9, 2014

Little Ravioli Soup


I took this picture to help me remember what I put in this soup. Missing from the picture is a can of fire roasted diced tomatoes and the spices I added the soup.
 

I found this package of Buitoni brand "Three Cheese Ravioletti" (9 ounce package) on clearance months ago.  I bought two and threw them in the freezer.  If you can't find these little ravioli, I am sure regular sized ravioli would be tasty in the soup.  The little ravioli are just nice in soup since they are bite-sized.  And also, the little ravioli are cute and it's a scientifically proven fact that cute food tastes better. 
 
Trust me!
 

Little Ravioli Soup

1 package (9 ounce size) Buitoni Three Chesse Ravioletti (Parmesan, Romano, and Ricotta cheeses)
1 to 2 teaspoons extra virgin olive oil
1/2 pound Italian sausage (I used 3 links Johnsonville Sweet Italian sausage, casings removed)
1 bell pepper, diced (I used an orange one)
1 medium sized yellow onion, diced
1 can (14 ounce size) fire roasted diced tomatoes (may substitute diced tomatoes)
1 1/2 cups prepared, jarred tomato spaghetti sauce (I used Barilla Tomato & Basil sauce)
3 cups chicken broth (I used Organic Simple Truth brand from Kroger)
1/2 teaspoon dried oregano
1/2 teaspoon dried basil
1/2 teaspoon garlic powder
1/4 teaspoon  crushed red pepper flakes
1/4 teaspoon ground black pepper
1/4 to 1/2 teaspoon granulated sugar

Prepare ravioletti (or ravioli) according to package directions. Drain and set aside.

In a large soup pot, heat the olive oil over medium heat.  Add the sausage, cook and crumble until no pink remains.  Add in the diced bell pepper and onion. Cook, stirring frequently, for 3 to 5 minutes.  Add in the remaining ingredients (except the ravioletti or ravioli), bring to a boil, cover with a lid, and reduce to simmer.  Cook, stirring occasionally, for about 30 minutes.  Taste for seasoning. Add salt if desired.  I did not add any salt to this soup.

Add a little of the cooked ravioletti (or ravioli) to a soup bowl and ladle in hot soup. Enjoy!

Note:  I like to leave the ravioli and soup separate and just add a little bit of ravioli to each bowl of soup.  If you leave the ravioli in the soup and store it in the refrigerator, the pasta will continue to absorb more and more of the liquid from the soup and it alters the texture of the soup and  pasta... and not in a good way.  If you are feeding a large crowd and don't anticipate there being leftovers, feel free to add the cooked pasta to the soup.


Saturday, January 18, 2014

Stuffed Bell Pepper Soup with Quinoa: Gluten Free


Stuffed Bell Pepper Soup with Quinoa

I have been wanting to try to make a Stuffed Bell Pepper Soup for awhile now and finally got around to it.  This soup was pretty easy to throw together.  We are trying to eat less processed starchy foods, so instead of putting pasta or white rice in this soup, I opted for quinoa.  If you've not jumped on the quinoa band wagon yet, quinoa is ancient grain and, if I understand correctly, it's the only grain which is also a complete protein.  I made and am storing the soup and the quinoa separately.  I  have found that things like pasta and rice get weird if left in soup, so I am just adding a bit of quinoa to each portion of soup when I reheat it.

1 pound lean ground beef
1 teaspoon extra virgin olive oil
2 bell peppers, diced
1 large yellow onion, diced
3 to 4 cloves of garlic, finely diced
1 can (14.5 ounce size) of fire roasted diced tomatoes
2 cans (14.5 ounce size) reduced sodium, low fat or fat free beef broth
kosher salt and freshly ground black pepper
granulated sugar
1 teaspoon Italian seasoning (dried herbs)
cooked quinoa
grated mozzarella cheese or grated Parmesan cheese

In a large skillet, cook and crumble ground beef until no pink remains. Drain off fat and set aside.

In a large soup pot, heat the olive oil over medium to medium high heat. Add in the peppers and onions, the Italian seasoning, a pinch of salt, and some black pepper, and sauté for 3 to 5 minutes, stirring frequently. Add in the garlic and cook for one additional minute, stirring frequently. 

Add in the cooked ground beef, the tomatoes, and the beef broth.  Bring to a boil, reduce to a simmer, and cover the pot with a lid and simmer to 10 to 15 minutes.  We like the veggies with a little crunch so we don't simmer the soup for very long. Taste for seasoning; add in salt, pepper, and a little granulated sugar, if needed.

For serving, spoon a little cooked quinoa (about 2 to 3 tablespoons) into each serving bowl. Top with a little grated mozzarella cheese or Parmesan cheese and ladle in hot soup.

Makes 5 servings.  I keep the quinoa and soup separate in the refrigerator and then just add in a little quinoa when I reheat each portion of soup.

Enjoy!


Monday, August 12, 2013

Weekend Cooking


I have never used these noodles before today.  Do you use them?  I can see they would be good in lots of recipes. I was thinking they would be good with Swedish  Meatballs, Tuna Casserole, and lots of other dishes. 

Today I used these "No Yolks" noodles in a recipe called Sour Cream Noodle Bake from The Pioneer Woman. Hubby and I liked it and I'll definitely make it again. It is unlike anything else we have in our rotation of meals. I had seconds and my husband went back for thirds!!  The Pioneer Woman's recipes never disappoint.  I made this recipe because when I was watching The Pioneer Woman show on TV, my husband said, "That looks good!" 

Sour Cream Noodle Bake from The Pioneer Woman
Recipe link is here.

 
As I was doing the dishes I realized I did not take a photo of the finished dish.  Sorry about that. We really enjoyed the leftovers from this recipe; the leftovers reheated really well in the microwave. I was hoping to bring the leftovers to work for my lunches but the leftovers are all gone. Boo Hoo! 

I am also planning to try two other new recipes this week. Here are the links:

http://www.familyfreshmeals.com/2012/05/cool-ranch-crockpot-chicken-tacos-or-tostadas.html

http://crockpotladies.com/recipe-categories/entrees/crockpot-hot-stromboli-sandwiches/

Monday, July 29, 2013

Cooking and Baking with Mom


I am cooking and baking with my Mom!  We are making Impossibly Easy Zucchini Pie with fresh from the garden veggies. I am in Oregon for a visit. 


Monday, June 10, 2013

Carnival Breeze Cruise... On Board Cooking Demonstration


I am slowly sharing my experiences about our recent trip on the Carnival Breeze in the Caribbean. If I were to write about it all in one post, smoke would probably start coming out of my computer... so much to say!

One of the most fun things I did on the ship on one of the "Sea Days" (where we were just sailing... no stops) was attend a Cooking Demonstration in the ship's fancy restaurants called "Fahrenheit 555 Steakhouse".  It was on Deck #5 and it was one of the restaurants where you had to pay $35.00 per person to eat at this restaurant. 

Tuesday, May 14, 2013

Super (Souper) Nachos and NEW Ginsu Knives


Super * Souper * Nachos

Another recipe from my husband... who really doesn't cook.

A few years back, the boys said they wanted "nachos" on Super Bowl Sunday.  We've been making nachos at home like this ever since.  We had this for dinner on Mother's Day on Sunday.  I cooked but I did not do the dishes.

This meal is kind of decadent but darn good comfort food.  It's also a pretty quick and easy meal for a week night. The thing that makes our version of nachos different is that we combine 1 can of Campbell's Fiesta Nacho Cheese Soup with 1/2 a can of refried beans.  We used to heat this combination, which basically makes a hot dip, we ate it with crunchy corn tortilla chips, and we called it "dinner".   Now our nachos have become more elaborate.

Super Souper Nachos

1 pound ground beef
approx. 1/4 teaspoon garlic powder, salt, ground black pepper, & crushed red pepper flakes
approx. 1/8 teaspoon dried basil & dried oregano
1 can (14 - 15 ounce size) refried beans (we like Rosarita brand fat-free refried beans)
1 can Campbell's Fiesta Nacho Cheese Soup
1 big bag of Doritos (we like Tapatio Flavor, Taco Flavor, and Nacho Cheese Flavor) or any other corn tortilla chips

Your favorite nacho toppings:
diced tomatoes
shredded ice berg or romaine lettuce
diced red onion or diced yellow onion
jalapeno slices (from a jar)
grated cheese (optional)
sliced olives
sour cream or low fat plain yogurt
your favorite salsa (optional) if desired

In a large skillet, cook and crumble the ground beef until no pink remains.  Drain fat if necessary and season the ground beef.  We really never measure these spices... just a few pinches of the basil and oregano... but we use even more of the garlic powder, salt, pepper and crushed red pepper flakes.  So much easier and tastier than those salty taco seasoning packets.

Meanwhile, in a medium sized pot, combine the can of cheese soup with 1/2 can of the refried beans.  Cook over medium heat, stirring frequently and cooking until bubbling and very hot.   If desired, heat the remaining 1/2 can of refried beans (in the microwave oven) to serve with the nachos or save for another use (See Mexican Eggs recipe HERE which is a great use for leftover refried beans.  Have this for breakfast tomorrow!).

We serve our Super Souper Nachos family style... small containers of the nacho toppings are scattered all over the dining room table and everyone gets to make their nachos to suit their own tastes.  Layer the chips on a big plate (we like to mash up the chips a bit with our hands), sprinkle on some of the seasoned ground beef, drizzle on the hot cheesy bean concoction, and top as desired with your favorite nacho toppings.  Eat with a fork or dig in with your hands.  Enjoy!

Servings: should easily serve 4 people but sadly our family of 3 will eat this all in one sitting. Doh!

*********

I mentioned above that I made this meal for Mother's Day this past Sunday.  What made this FUN was that I had some Ginsu Knives delivered to my house on Saturday.  You see, my brother-in-law went to the Annual Berkshire Hathaway Convention in Omaha, Nebraska, earlier this month.  From what I what I understand, various companies in which Berkshire Hathaway invests have booths displaying their wares at the convention.  I knew Warren Buffett was into Coca Cola and  Dairy Queen... turns out Ginsu knives factor in there some where too.  Lucky for me!  I used the knives to chop up my nacho toppings and these knives are great! 


Question:  The ultimate test of how good (or bad) a knife is?

Answer:  How well the knife works cutting a ripe tomato!  My new knives rock!

When we were eating the nachos my husband commented, "Why all the extra veggies!"
My reply... "I was having so much fun chopping veggies, I just couldn't stop!"

Cutting the tomato was like a hot knife going through butter.  So stoked about my great new knives.  I especially like the knife that is not serrated; the knife which is the second from the top in the photo above.  I think this is a "santoku" knife.  It's a little smaller than my chef's knife (which is an adjustment) but I LOVE it!

Friday, May 10, 2013

Lasagna Soup


Lasagna Soup

I read a blog called My Bizzy Kitchen nearly every day. I sure like this blog. From reading the blog, I feel like I can relate pretty well with the blog's writer who refers to herself as "Biz".  She's about the same age as me, she likes to cook, and she's been struggling with keeping her weight down; I can relate to all of that.  She blogs about pretty much everything she eats and also what she is doing for exercise.  She is diabetic and often includes Weight Watcher's points for many of her recipes (if you find that helpful).

I have tried a number of Biz's recipes and they are all fantastic.  In general I get lots of good ideas from seeing what she's cooking and eating.  Biz has been going on and on about Lasagna Soup so I decided to give it a whirl.  Biz says she's making the recipe she found on a blog called Two dogs in the Kitchen.

 
Broken up pieces of lasagna pasta... any small or medium sized pasta would do (bowties and shells come to mind).  I will use something other than lasagna next time... a little easier to eat in soup...


 I cooked the soup, portioned it out into 4 servings, and the kept the pasta in a separate container.  The pasta, if left in the soup, would soak up all the soupy-ness and the pasta might get mushy.

 
When I was ready to have some soup, I warmed up one portion in the microwave for about 2 minutes, added in a bit of the cooked pasta, and then warmed it for another 30 seconds in the microwave.  I put a scoop of "cheesy goodness" in the bottom of my soup bowl and then added in the hot soup.


So tasty.  It really does taste like Lasagna!

I strayed wildly from the recipe as written but it still turned out great.  I've been making lots of homemade pizza lately and I never quite use an entire jar of sauce (I use two kinds of Bertolli brand jarred tomato pasta sauces).  I started to save the leftover sauce in the freezer in small plastic storage containers so when I made this soup, I thawed some of the leftover odds and ends of sauce and even threw in 1/2 of a small can of tomato sauce which was also in the freezer.  I used leftover cooked crumbled Italian sausage (Johnsonville brand hot bulk Italian sausage) and leftover lasagna noodles.  I just had to get some ricotta cheese at the store for the "cheesy goodness".  You CANNOT skip the "cheesy goodness" (see below)!

Lasagna Soup

For the soup:
2 cups jarred tomato marinara sauce (such as Bertolli brand tomato basil sauce)
1/4 cup tomato sauce (optional)
1 cup water
1 can (14.5 ounce size) chicken broth
cooked crumbled Italian sausage (I used less than 1/2 pound)
1/2 teaspoon dried oregano
1/2 teaspoon dried basil
1/2 teaspoon garlic powder
1/4 teaspoon crushed red pepper flakes
1/4 teaspoon freshly ground black pepper
1 bay leaf
5 to 6 ounces dried pasta

For the "cheesy goodness" which is what TOTALLY makes the soup amazingly wonderful:
4 ounces ricotta cheese (I used a low fat/lower calorie variety, Friggo brand)
2 to 3 tablespoons grated Parmesan cheese (I used KRAFT brand)
a generous pinch of salt
a few grinds of black pepper.

In a soup pot, combine all of the soup ingredients except the pasta.  Bring to a boil, cover with a lid, and allow to gently simmer for about 15 to 20 minutes.

Meanwhile, cook the pasta according to the package instructions.  I used left over lasagna noodles which I broke into small pieces but any small or medium sized pasta would be great.  Drain the pasta and spread out on a cookie tray or platter to cool.  If desired, drizzle a little olive oil on the pasta to keep it from sticking together. I skipped this to save on calories.

In a small bowl, make up the "cheesy goodness".  Combine the ricotta cheese, Parmesan cheese, salt and pepper; stir well with a fork to combine.

To serve, place 1/4 of the "cheesy goodness" in a soup bowl.  Add in 1/4 of the cooked pasta and cover with hot soup. Stir in the cheesy goodness and enjoy!

I stored my soup, pasta, and cheesy goodness in the refrigerator in separate containers to keep the pasta from absorbing all of the soup liquid.  I added the cheesy goodness to each individual portion of warmed up soup.  This soup was so good I had it for lunch and for dinner yesterday!

Wednesday, May 8, 2013

Taco Pizza


TACO PIZZA
A recipe from my husband... Taco Pizza.  We've been making this recipe for years but I keep tweaking it.  It's one of my husband's favorite meals and it's actually a vegetarian dish... which is hilarious to anyone who knows my husband because he's quite the carnivore.  My husband said when he was a kid, he loved to go to "Happy Joe's Pizza" and get a taco pizza.  It would come smothered with shredded ice berg lettuce and sliced fresh tomato and he tells me how he used to remove and throw away all the tomatoes. Now he likes the tomatoes.  Here is our version...


It doesn't look like much... crust, sauce, diced red onion, and grated cheese... but wait... there's more.


Crushed corn tortilla chips for crunch.  This time we used Tostitos brand blue corn chips... great!


A few teaspoons of warm and creamy refried beans (from a can).  My husband does not eat the pizza with beans... so the beans are optional but I think they add a LOT!


Here's where it gets really good.  Shredded lettuce and lots of fresh diced tomatoes... add a little salt and black pepper if desired.


And if you want to get even fancier, drizzle on a little sour cream.  I use low-fat plain yogurt.  I added a sprinkle of salt and freshly ground black pepper after I snapped this photo.

You can make this meal with your own favorite crust recipe, your own favorite taco sauce, and you can add your other favorite taco toppings... ground, seasoned hamburger, black olives, jalapeno slices.  Whatever you like.  The recipe below is very flexible.  It's more of an idea than a precise recipe.

I have used home made pizza dough but I have also used pre-baked pizza crust such as Mama Mary's, which I think are very good (if you are using a pre-baked crust, follow the cooking instructions on the package).

Taco Pizza

1/2 recipe pizza crust - See RECIPE below or use your favorite store bought crust
about 1 cup taco sauce (we use Ortega brand mild taco sauce)
1/2 to 3/4 cup red onion (small dice) - yellow onion works too
1 to 1 1/2 cups grated cheese (cheddar, colby jack, Mexican blend)
canned refried beans, warmed in microwave
shredded lettuce
diced tomatoes
sour cream or plain yogurt
optional toppings: black olives, sliced jalapenos, radishes

I yammered on and on about making great homemade pizza at home in a recent post about pizza; click HERE to see that post.  I will be more brief this time around. I measure nothing when I throw this together.  It's all about the ingredients, your preferences, and technique for using a pizza stone.
Ready to make this Taco Pizza? Let's go!
  1. Move your oven rack to the highest position available.
  2. Place your pizza stone in the oven on the top rack.
  3. Preheat your oven and pizza stone to 485 degrees Fahrenheit.
  4. Assemble all of your ingredients and have them ready; you want to work rather quickly once the dough hits the hot, hot, hot pizza stone.
  5. On a cutting board, sheet pan, or clean counter top, roll your crust out into a sort of round shape about the size of your pizza stone. Use a little a little flour on your work surface and rolling pin to keep the dough from sticking. You can also put a little cornmeal under the dough.
  6. Once your pizza stone and oven are preheated to 485 degrees, put your smokin' hot pizza stone on the counter top every hot pad you own to protect your counter top. Carefully put the dough on the pizza stone... shape the dough a little if you need to but it pretty much starts to cook the second you put the dough on the stone so you don't have a lot of time to mess with it. Top the dough with taco sauce, grated cheese, and diced onion. Quickly and carefully get this pie in the oven.
  7. Bake 10 to 13 minutes, depending on how well done you like your pizza. I like it crisp on the bottom and the cheese browned on the top. Start checking after 10 minutes. Things can change quickly in 1 minute when the oven is this hot. I usually turn the pizza 180 degrees since the back of my oven is hotter than the front of the oven.
  8. Slide pizza carefully off of the pizza stone and onto a cutting board or sheet pan; slice into 8 slices.  Top as desired with taco fixings. Enjoy!
*************
Bread Machine Pizza Crust (makes 2 large, thin pizza crusts)
1 cup warm water
3 cups all purpose flour
1 tablespoon granulated sugar
1 teaspoon salt
2 teaspoons yeast (I use Fleishman's bread machine yeast; keep in in the fridge)
2 tablespoons extra virgin olive oil
Place ingredients in the bread machine in the order listed. I put the yeast on top of the flour and I put the salt, yeast, sugar, and oil, in the corners. Set to "dough" setting and start (according to your bread machine's instructions. My dough cycle takes 1 1/2 hours.  Let the dough rest for about 20 to 30 minutes before rolling out.  If dough is refrigerated, let it come to room temperature before rolling (sit out for 1 to 2 hours to come to room temperature).

Sunday, May 5, 2013

Cinco de Mayo: Beef Taco Skillet (Inspiration in the Kitchen Cupboard)


Beef Taco Skillet (Photo from www.campbellskitchen.com)

As I was preparing to go to the grocery store last week, I was taking a quick inventory of what I already had on hand in the cupboards, refrigerator, and freezer.  I noticed this recipe on the back of a Campbell's Tomato Soup can and realized I had all the ingredients already.  I really did not change the recipe that significantly; I replaced the flour tortillas with white corn tortillas, added in a can of dark red kidney beans, and increased the cooking liquids just a tad.  This is not a super authentic Mexican dish but it is what I made this week.  It's a nice and easy to make, you only have wash one skillet when you are done, and the leftovers reheat really well.  I should have snapped a photo while it was looking delicious, simmering away in the skillet on the stove top but I guess I was in a hurry.  I portioned it out in plastic storage containers for my work week lunches.

Beef Taco Skillet
Adapted from recipe on Campbell's Tomato Soup can (Original recipe link is HERE)
1 pound ground beef
1 can (10 3/4 ounces) Campbell's® Condensed Tomato Soup (Regular or Healthy Request®)
3/4 cup Pace® Picante Sauce
3/4 cup water
1 can (15 ounce size) dark red kidney beans
6 flour corn tortillas (6-inch), cut into 1-inch pieces
1/2 cup shredded Cheddar cheese

Cook the beef in a 12-inch skillet over medium-high heat until well browned, stirring often to separate meat.  Pour off any fat.  Stir the soup, picante sauce, water, beans. and tortillas in the skillet and heat to a boil.   Reduce the heat to low.  Cook for 5 - 8 minutes.  Stir the beef mixture.  Top with the cheese.

Sunday, April 21, 2013

Buffalo Chicken Blue Cheese Pizza

 
BUFFALO CHICKEN BLUE CHEESE PIZZA
 
Is it wrong that I am sort of drooling my mouth is watering as I am adding photos to this post? 
I keep making this pizza for my son. I want to make this for ME!
My husband likes this pizza too although I typically make a more traditional Italian Sausage and Cheese Pizza for me and my husband to share.
 
 
The ingredients are all assembled.  From left to right, in no particular order... black pepper, blue cheese crumbles, garlic powder, Frank's Red Hot Sauce, pre-shredded mozzarella cheese, and cooked, diced chicken (the equivalent of one large boneless, skinless chicken breast).

I yammered on and on about making great homemade pizza at home in my last post; click HERE to see that post and my Bread Machine Pizza Dough recipe.

I will be more brief this time around.  I measure nothing when I throw this together. 
It's all about the ingredients, your preferences, and technique for using a pizza stone.
 
Ready to make this Buffalo Chicken Blue Cheese Pizza? Let's go!
  1. Move your oven rack to the highest position available.
  2. Place your pizza stone in the oven on the top rack.
  3. Preheat your oven and pizza stone to 485 degrees Fahrenheit.
  4. Assemble all of your ingredients and have them ready; you want to work rather quickly once the dough hits the hot, hot, hot pizza stone.
  5. Roll your crust out into a sort of round shape about the size of your pizza stone.  Use a little a little flour the sheet pan and rolling pin to keep it from sticking. You can also put a little cornmeal under the dough.
  6. Once your pizza stone and oven are preheated to 485 degrees, put your smokin' hot pizza stone on the counter top every hot pad you own to protect your counter top. Carefully put the dough on the pizza stone... shape the dough a little if you need to but it pretty much starts to cook the second you put the dough on the stone so you don't have a lot of time to mess with it. Top the dough with hot sauce, chicken, mozzarella cheese, blue cheese crumbles; sprinkle a little garlic powder and a little ground black pepper over the entire pizza.  Quickly and carefully get this pie in the oven.
  7. Bake 10 to 15 minutes, depending on how well done you like your pizza.  I like it crisp on the bottom and the cheese browned on the top. Start checking after 10 minutes.  Things can change quickly in 1 minute when the oven is this hot.  I usually turn the pizza 180 degrees since the back of my oven is hotter than the front of the oven.


Looking good and it's not even cooked yet!
 

When done, slide the pizza back on to a cutting board or sheet pan and slice.


Nom, Nom, NOM!  (eating noises)


 gosh... I am so hungry now!
 

How to make Gourmet Pizza at Home (Pizza Kits)

Gourmet Pizza at Home - This time... "Italian Sausage and Cheese Pizza"
 
 
Well, maybe calling it "gourmet" is a bit of a stretch, but this is DARN good pizza and I make it a home!  I've been making homemade pizza for nealy 20 years... since my sister gave me a bread machine for Christmas.  The bread machine had a "dough" setting and my sister also sent along a great bread book with a basic pizza crust recipe.  The old bread machine has come and gone.  My newer "Sunbeam" brand bread machine from WalMart (cost about $44.00 a few years back) also has a "dough" setting.  I was not happy with my homemade pizza for many years. I made the pizza on cookie sheets and I even tried a pizza stone but the crust was never what I hoped for.  I was about to throw out my pizza stone several months ago but, before I did, I went back to the drawing board.  The result was this recipe for two thin crust pizzas.  Pizza at home is a bit of work, so I do all of the work once and essentially make kits for two pizzas so we can have pizza two times in one week.  I am intending for this to be a post about how I make a good pizza at home...  more about technique than a specific recipe. 
 
For this recipe, I use a bread machine (to make the dough) and I use a pizza stone to bake the pizza.
 
If I only use my bread machine for pizza dough and if I only use my pizza stone to make pizza, both are worthwhile investments. The pizza is that good! 
 
Of course, lots of folks also use stand mixers with a dough hook to make pizza crust.  Do whatever you prefer for the pizza dough. This is more of a post about my technique using the pizza stone...
 
*****************
 
Bread Machine Pizza Crust (makes 2 large, thin pizza crusts)
 
1 cup warm water
3 cups all purpose flour
1 tablespoon granulated sugar
1 teaspoon salt
2 teaspoons yeast (I use Fleishman's bread machine yeast; keep in in the fridge)
2 tablespoons extra virgin olive oil
 
Place ingredients in the bread machine in the order listed.  I put the yeast on top of the flour and I put the salt, yeast, sugar, and oil, in the corners.  Set to "dough" setting and start (according to your bread machine's instructions.  My dough cycle takes 1 1/2 hours.
 
  *****************************
 
Toppings: Of course, you can use whatever toppings you like. We routinely make pizza with sausage and cheese.  (I have some other recipes; I'll post about them another day).  For sauce, I used jarred pasta sauce.  Our favorite is Bertolli Brand Tomato and Basil which comes in a 24 ounce jar.  I use a generous cup of sauce on each pizza so we nearly use 1 jar for two pizzas.  For sausage, we use 1 to 1 1/4 pound packages of Johnsonville brand Italian Sausage (hot, sweet, or mild... you can't go wrong; they are all good).  I also use pre-shredded mozarella cheese.  Additionally, I use dried Italian herbs, garlic powder, and crushed red pepper flakes.
 
One of the tricks to making pizza at home is allowing the dough to rest for at least 20 minutes.  When the dough is done kneading and resting/rising in the bread machine, I turn the dough out onto a lightly floured work surface and divide the dough in half
 
If I am not making pizza right away, I dust each ball of dough with a little flour and place each ball into a gallon sized zip closure plastic bag.  The dough will continue to rise in the refrigerator so a big bag (or container) is necessary.  When I am ready to make the pizza, it's important to let the dough come up to room temperature.  I get the dough out of the fridge an hour or two before I want to make pizza. 
 
If I am making pizza right away, I let the dough rest for at least 20 to 30 minutes while I preheat the oven and prepare/assemble the other ingredients. Often I make one pizza right away and put the remaining dough in the refrigerator for use later in the week.
 
Ready to make pizza? Let's go!
  1. Move your oven rack to the highest position available.
  2. Place your pizza stone in the oven on the top rack.
  3. Preheat your oven and pizza stone to 485 degrees Fahrenheit.
  4. Assemble all of you ingredients and have them ready; you want to work rather quickly once the dough hits the hot, hot, hot pizza stone. 


Here you can see I have my grated mozzarella cheese, jarred tomato sauce, seasonings (garlic powder, crushed red pepper flakes, and dried Italian herbs), and also some cooked, crumbled pork Italian sausage, draining on some paper towel.  (Note: if your sauce has been refrigerated, warm it up for about a minute in the microwave).

I have my pizza crust rolled out into a sort of round shape about the size of my pizza stone. I used a little flour on my sheet pan and rolling pin to keep it from sticking. You can also put a little cornmeal under the dough.


Oh, here's a close up of those ingredients...

 
Once your pizza stone and oven are preheated to 485 degrees, put your smokin' hot pizza stone on the counter top every hot pad you own to protect your counter top.  Carefully put the dough on the pizza stone... shape the dough a little if you need to but it pretty much starts to cook the second you put the dough on the stone so you don't have a lot of time to mess with it.  Top the pizza with the sauce, ground sausage, cheese, and generously sprinkle garlic powder, crushed red pepper flakes, and dried Italian herbs over the entire pizza.  If I am adding other ingredients such as finely sliced red onion or bell pepper, I put them on top of the cheese.   Quickly and carefully get this pie in the oven.


Bake for 10 to 15 minutes.  I like it a bit on the crispy side.  Just keep an eye on it after 10 minutes.  A lot can happen in 1 minute in an oven cranked up to 485 degrees.

Carefully slide the pizza back onto the sheet pan, slice, and enjoy!

 
 One pizza down; one to go.  Here I have a ball of dough and the remaining sauce, cheese, and cooked/crumbled sausage ready for pizza another day later in the week.
 I try to use up the dough within 2 or 3 days.